
Learn how to make this polymer clay hand incense holder, perfect do it yourself room decor. Make this clay hand incense holder with your friends and light some incense with your own unique style!
Materials:
- Rolling Pin
- Polymer Clay
- X-Acto Knife
- Paper
- Scissors
- Dotting Tools
- Texture Wheel
- Ball-end Tool
- Needle Tool
STEP
1
flat clay

Flatten the clay out using rolling pin.
STEP
2
cut out a paper

Cut out a sheet of paper the size of clay piece.
STEP
3
hand shape

Draw and cut out a hand shape.
STEP
4
cut the hand out

Carefully trace and cut out the hand shape from the clay using the knife.
STEP
5
rough edges

Gently smooth out the rough edges.
STEP
6
EYE SHAPE

Draw an eye shape and soften the harsh line with a tool or fingers.
STEP
7
Draw your desired designs

Draw designs with your choice tools. Poke a hole on it where the incense will go.
STEP
8
clay molding

Place the hand on the card board and roll cotton underneath the fingers. This will serve as support during the baking.
STEP
9
clay preparation

Bake the clay according to the instructions.
STEP
10
clay division

For the next version, get a paper and fold it in half. Cut out a half eye shape.
STEP
11
EYE SHAPE

Fold the paper and cut it again to make sure eye shape is even.
STEP
12
rough edges

Use this to trace the eye from the clay and cut it out. Dont forget to soften the rough edges.
STEP
13
Add some texture

Create texture using a texture wheel or any tool you want.
STEP
14
Iris shape

Use the ball tool to create the iris shape.
STEP
15
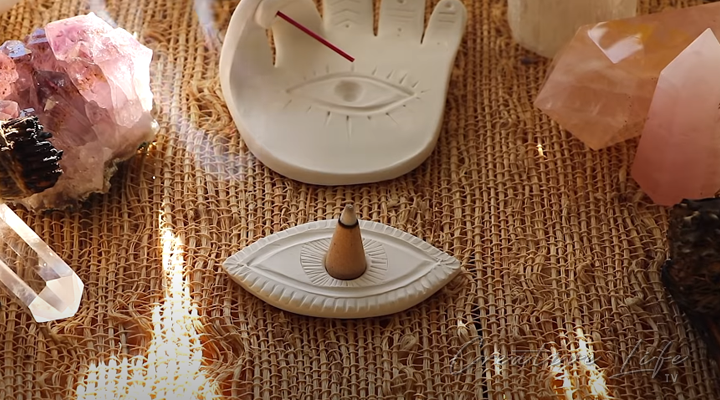
make sure it fits!

Place the cone incense to make sure it fits.
STEP
16
baking time!

Bake the clay according to the instructions.


