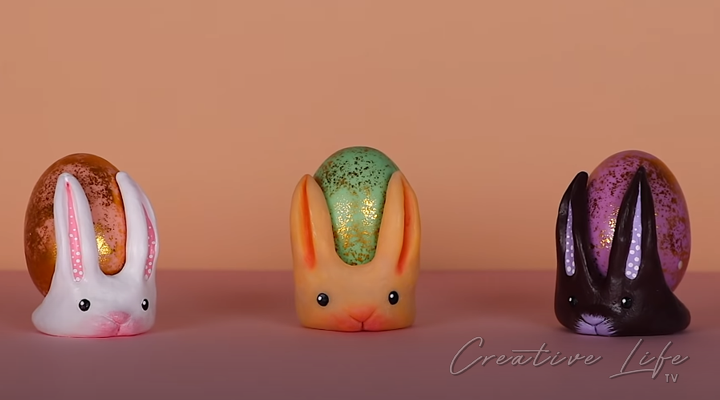

Learn how to make these adorable Easter bunny egg holders as a personalized gift for family and friends. Be sure to make one for yourself.
Materials:
- Clay
- Needle End
- Pointer Tool
- Rubber Tip Tool
- Dotting Tool
- Plastic Egg
- Paint Brushes
- Bake and Bond
- Variety of Paint Colors
STEP
1
press the egg

Press a clay into a ball and press an egg on it.
STEP
2
add another piece

Add a piece of clay on top and blend it together.
STEP
3
long piece of clay

Roll long piece pf clay for the ears. Take the end brush and push onto the ears.
STEP
4
attach the ears

Attach the ears using the dotting tool. Press the egg again onto the clay to make sure it fits.
STEP
5
clay in middle and sides

Add a piece of clay in the middle of the ears. Add another piece of clay on both side and blend it all together.
STEP
6
prepare the nose

Make a triangle shape for the nose. Add tow small clay circles around the nose and blend it with the triangle clay. Use the needle tool to define the shape of the nose.
STEP
7
eye holes

Use a dotting tool to make the eye holes.
STEP
8
bake & bond

Use bake & bond to attach the tail and blend it to the base.
STEP
9
baking time!

Bake according to package directions.
STEP
10
optional step

Use soft pastels to paint the bunny.
STEP
11
black eyes

Paint or use black clay for the eyes.
STEP
12
optional step

Add a white dot of paint to the eyes.

